How to Make an Arduino Nano Bluetooth for Airsoft
How to Make an Arduino Nano Bluetooth for Airsoft
Wonder how you can pair and control your Arduino Board with Bluetooth? If so, you're in the right place! In today's Arduino Bluetooth tutorial, I'll be guiding yous on how you can easily go started!
Alongside the Arduino Bluetooth tutorial, I'll be providing:
- A list of Arduino Bluetooth modules for your consideration
- Arduino Bluetooth projects to go started
Footstep past Step Arduino Bluetooth Tutorial
Let's get started correct away with the Arduino Bluetooth Tutorial, where I'll provide all you need to know near pairing Arduino with Bluetooth. Ranging from hardware configurations to programming and using it with your iPhone or Andriod devices!
1. What do you need for this Arduino Bluetooth Tutorial:
- You lot tin use the Arduino nano or Arduino Uno for this Bluetooth tutorial
More on the Bluetooth Module used:
Grove – Blueseeed – Dual model (HM13)

Flexible and packed with loftier Bluetooth transmission speed, the Grove – Blueseeed LE – Dual Model (HM13) uses CSR dual-mode Bluetooth chip, with the ARM architecture single flake that supports AT instructions.
- This allows users like yourself to accept control over the serial baud rate, equipment name, pairing password!
You may exist wondering; why not the HC-06 or HC-05 Arduino Bluetooth module instead? Well, with the Grove – Blueseeed – Dual Model (HM13), you're getting the following primal advantages:
- Bluetooth 4.0 BLE rather than Bluetooth V2.0
- Depression power consumption
To not dwell on the tutorial whatsoever longer, You lot tin can notice out more virtually this Bluetooth Module here!
2. Hardware configurations:
- Step 1: Connect the Grove – Blueseeed – Dual model (HM13) to a Grove port on the Grove – Base Shield via the Grove cable
- Stride ii: Plug Grove – Base Shield into your Arduino lath
- Step 3: Connect your Arduino to PC via USB cable
3. Understanding the software:
Conventions
- In EDR mode, only the slave can be configured while either master or slave tin be in BLE mode.
- Factory default setting:
- EDR Name HMSoft, Slave role, PinCode 1234
- BLE Name HMSoft, Slave role, PinCode 000000
- Baud: 115200, N, 8, ane;
- AT Control format:
- Capital AT command format. string format, without whatsoever other symbol. (e.g. \r or \north).
- Whatever incorrect command would become no response.
For the total listing of AT commands, y'all can caput over to our wiki folio!
4. How to program on the Arduino Bluetooth Module
After understanding the software configurations, here'southward how to configure Bluetooth with a PC. For hardware connection, do refer to the "Hardware configurations" section. You'll notice that the flashing blue LED on the module illustrates no connection is prepare up
- Step 1: Open a serial terminal and set Baud Rate: 115200, Databits: viii, Stopbits: 1, and no flow control like to a higher place
- Step 2: Send "AT" to Bluetooth with the series terminal to bank check if you receive an "OK"
- The Bluetooth only respond AT commands either when:
- No connection is set
- All commands were seen equally cord and sent out
- The Bluetooth only respond AT commands either when:
*You tin can distinguish the to a higher place status in stride two through LED indications.
It should look something similar this after the in a higher place steps:

Here are some useful configurations that can be sent:
- Test serial connection, ship "AT", volition return "OK".
- Restore manufacturing plant settings, send "AT+RENEW", return "OK+RENEW".
- Reset baud charge per unit of serial port, send "AT+BAUD2", render "OK+Set:two".
- Enable authentication, transport "AT+AUTH1", return "OK+Gear up:1".
- Reset the Bluetooth, ship "AT+RESET", return "OK+RESET".
- Query firmware version, send "AT+VERS?", return "OK+Get:HMSoftV217".
- Query MAC of EDR, transport "AT+ADDE?", return "OK+Get:000E0E002074".
- Query MAC of BLE, ship "AT+ADDB?", return "OK+Become:000E0B002074".
- Set the name of EDR, send "AT+NAMEHM-13-EDR", return "OK+Gear up:HM-13-EDR".
- Set the proper name of BLE, ship "AT+NAMEHM-13-BLE", return "OK+Set:HM-13-BLE".
- Set the password of EDR, transport "AT+PINE123451", render "OK+Gear up:123451".
- Set the password of BLE, send "AT+PINB123451", return "OK+Set:123451".
- Enable discovery and connectable, send "AT+SCAN0", return "OK+Set:0".
- Enable notify information of connection, ship "AT+NOTI1", return "OK+Set:1".
- Notify information include accost, send "AT+NOTP1", return "OK+Set:i".
- Enable user key, transport "AT+PIO01", return "OK+Prepare:1".
- Ready to Central manner, transport "AT+ROLB1", return "AT+ROLB1".
- Set to Peripheral manner, ship "AT+ROLB0", return "AT+ROLB0".
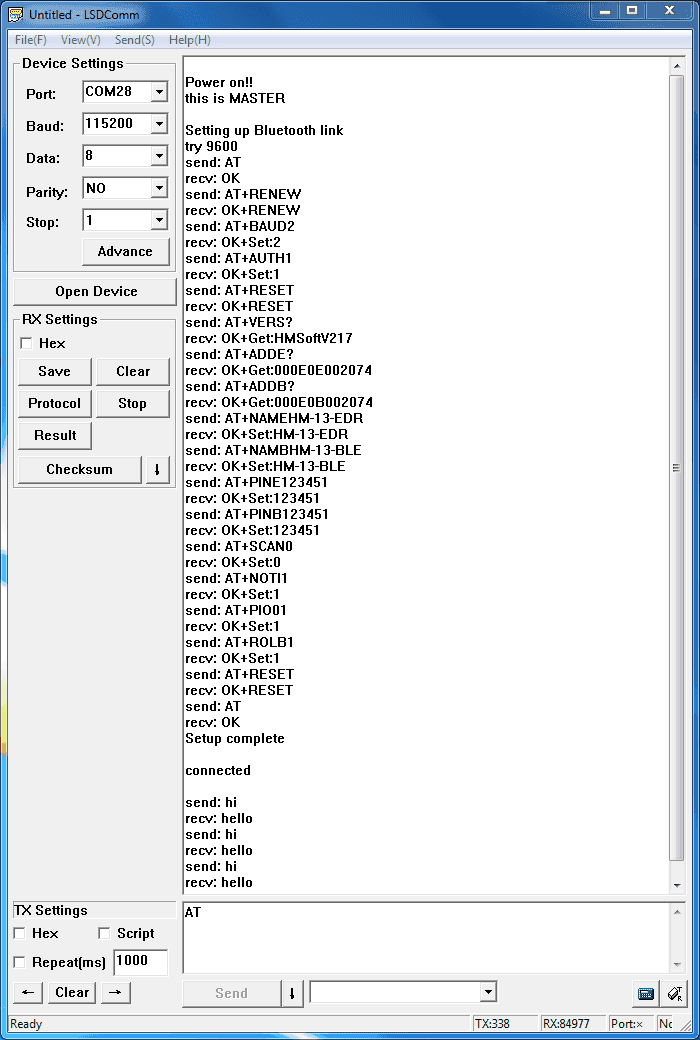
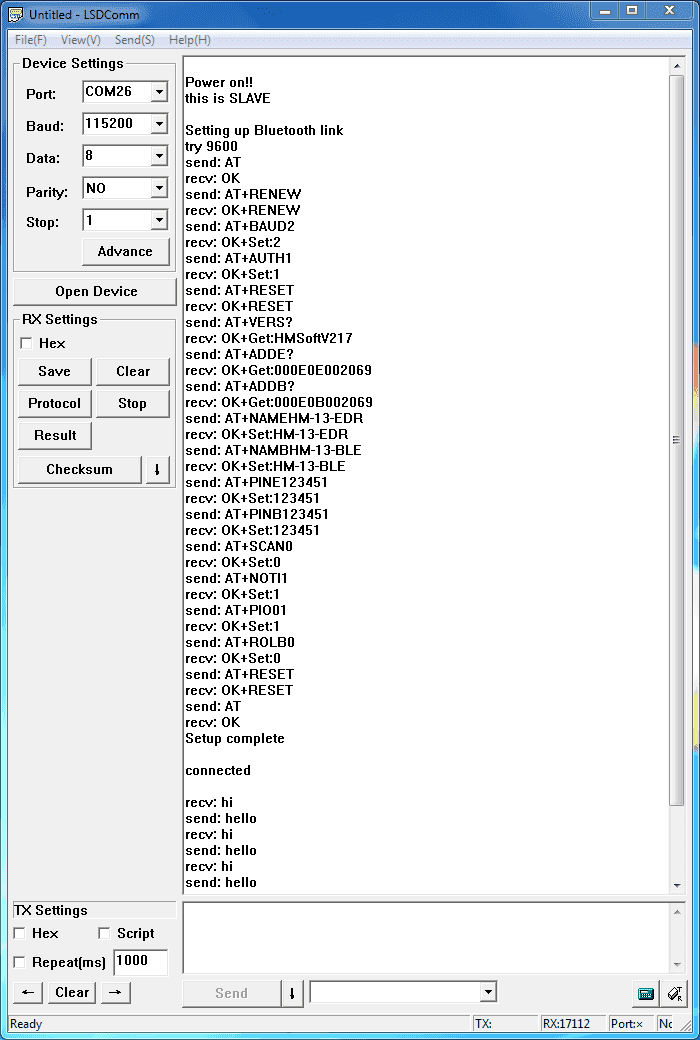
We used two Bluetooth that was connected with the PC, with ane set as central while the other as Peripheral. Several seconds later, they find each other and the LED stops flash connected!
5. How to pair Arduino Bluetooth Module with iPhone and Andriod
Since the Grove – Blueseeed – Dual model (HM13) have two protocol: Bluetooth EDR (Enhanced Data Rate) and Bluetooth Depression Energy (BLE), it can communicate with either Andriod or iPhones!
For this part of the tutorial, we'll utilize an iPhone to demonstrate how you can interact with Bluetooth!
*Annotation: The tutorial beneath is run on an older version of ios but it should even so work the same
- Step 1:Power the Bluetooth and configure it as a Peripheral function
- Pace 2: Search LightBlue in the App Shop and install information technology
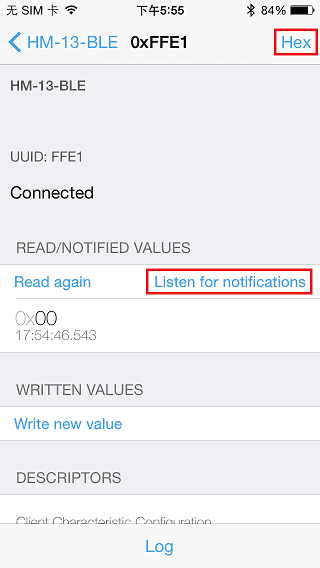
- Step iii: Launch the app, and connect to "HM-13-BLE"

- Footstep 4: Touch on properties and hit "listen for notifications" to enable data receiving
- There'due south a "Hex" key on the top right under properties to modify data format too
- Step 5: Striking "Write new value" and write some words to kickoff sending data to the PC
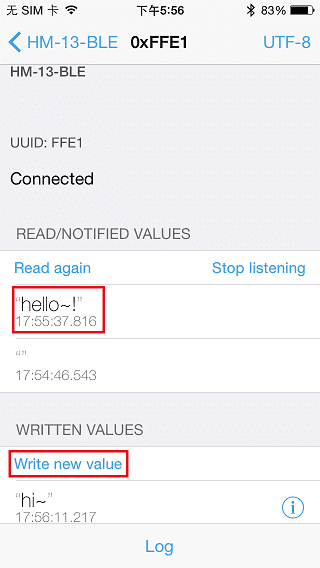
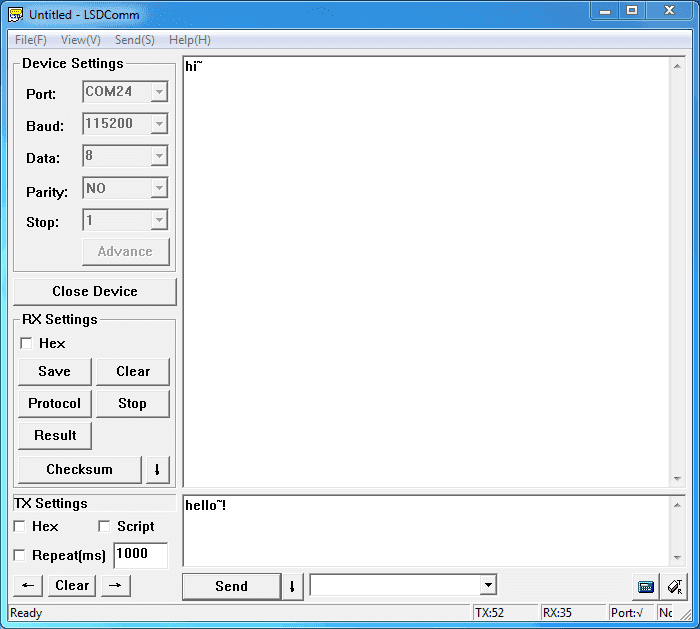
With the serial terminal, you can transfer data from the PC to iPhone too:
6. Bluetooth Data transmission guide between two Arduino boards
Now after all the in a higher place steps, are you ready to code? In this last section, nosotros'll employ two Arduino Uno and a pair of Bluetooth modules to get started!
- Pace 1: Set the connexion mentioned in the hardware configurations section
- Step 2: Assign the Bluetooth to Fundamental role past modifying the text to "#ascertain Main ane"
- The program of Central and Peripheral utilise the aforementioned code but there'due south a difference in the micro ascertain at the start of the program
- Step three: Follow the flow chart below for initialization of the programme
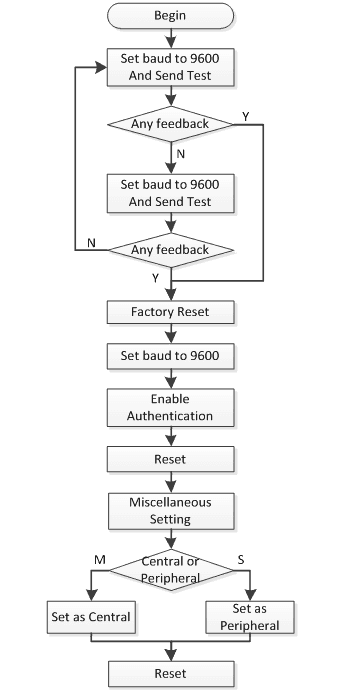
After the initialization, the Central and Peripheral will practice dissimilar things; Central will send bulletin to Peripheral interval and impress what'southward received from Peripheral while the Peripheral merely responds to the central
- Stride four: Download the test lawmaking and open HM-13_SW.ino with Arduino IDE, compile and download to Arduino Uno
- Recollect to configure the Bluetooth to different role by modifying the macro at the beginning
- Step five: Afer program is downloaded, open 2 series final windows and wait for the Bluetooth connection
- A connection is indicated past: LEDs on the Bluetooth modules will flash for a few seconds, stop to flash, and kept on
According to the plan written, the Primal will now send a message to the Peripheral continually and get feedback every fourth dimension
List of other recommended Arduino Bluetooth modules
Now that I've gone through the above Arduino Bluetooth tutorial, here'southward a list of other recommended Arduino Bluetooth modules to endeavour! They are all Grove compatible!
Grove compatible?
Grove system is Seeed very own initiative, mainly aimed at helping users similar yourself to easily use different modules, sensors, and more than through our plug and play organization!
- We currently already hold more than 200 Grove modules, including other modules/sensor types for you to choose from!
Don't believe how easy pairing is made possible with Grove? Below shows a general Arduino Bluetooth module vs one of our Grove – Bluetooth Modules:
Similar how simple and less messy it is?
All you need is a Grove Base of operations Shield alongside your Arduino and you're skillful to go!
Ok, now permit us start with our listing of Arduino Bluetooth Modules and Shields!
ane. Bluetooth V4.0 option: Grove – Blueseeed (HM11)

The most complete, most convenient, the most stable of Bluetooth Data transmission, remote command, PIO conquering module
Master and Slave in one
Remote control without other MCU
The PIO data acquisition without other MCU
The Grove – Blueseeed LE (HM11) is a Low Energy Bluetooth module that utilizes an HM11 with capabilities described as the one above in its datasheet. It can be used with your Arduino board alongside the base shield like to the before tutorial!
With back up for a BLE ComAssistant APK, this Bluetooth module can hands communicate with your phone without pairing!
- It can be set via AT commands directly as well!
Applicative in many weather condition such as robot controls or remote control equipment, this Arduino Bluetooth Module is suitable for both beginners and avid tinkerers!
Interested to find out more?
- Nosotros've provided an like shooting fish in a barrel and user-friendly command set alongside an Arduino pairing tutorial on our product page!
2) Grove – Serial Blueseeed (CSR BC417)

Looking for an option that rivals the HC-06 Bluetooth Module? The Grove – Series Blueseeed (CSR BC417) not but matches the Bluetooth V2.0 and hopping spread spectrum technique, only information technology supports a higher transmission speed and ease of pairing!
When planning to utilise the HC-06 Bluetooth Module, you have to get through the tedious way of converting voltages, dealing with voltage dividers and electrical circuits which is not credible on the Grove – Series Blueseeed!
- Thank you to our Grove system, all you need to pair the Grove – Serial Blueseeed with Arduino are plug-and-play Grove cables!
Apart from its ease of pairing, it features a selectable baud charge per unit and a within 30min motorcar-reconnect when disconnected feature every bit well!
Interested to find out more than?
- We've provided an like shooting fish in a barrel and convenient command ready alongside an Arduino pairing tutorial on our product folio!
3) Arduino Bluetooth Shield option: Blueseeed Shield V2 (HM01)

Looking for an Arduino Bluetooth shield choice instead? Here's the get-go recommended selection!
Based on the HM01 Bluetooth module, it's a low cost and easy to utilize option with Bluetooth 2.0 technology and integrated Grove ports for you to install our plethora of Grove Modules!
Here are its features and specifications:
- Seeeduino/Arduino compatible
- Up to 10m communication distance in house without obstacle
- A full set of configuration commands
- UART interface (TTL) with programmable baud charge per unit
- On board PCB Antenna
- Input Voltage: 3.3V
- Baudrate: 9600, 19200, 38400, 57600, 115200, 230400, 460800
- Default Baud rate: 9600, Data bits: eight, Stop bit: 1, Parity: No parity
- Default PINCODE:"1234"
Interested to find out more than?
- We've provided an Arduino and Andriod pairing tutorial on our production page!
4) HM11 Shield Option: Seeed Blueseeed Shield (HM11)

Like what you saw about the HM11 Arduino Bluetooth module earlier with the first recommendation? This is a shield version; more functions, and even easier connectivity!
Since it'southward packed with exactly what you lot'll become from the HM11 module; Bluetooth V4.0, 2.4Ghz band, etc., I'll just comprehend its specialties!
For that, we'll take a expect into its hardware:

- HM-11 module
- Signal lamp: Lamp volition blink if BLE is not connected, but the lamp will go on lighting after BLE has been connected
- Grove connectors: Two Grove connectors for convenient plugging of Grove products onto the lath
- Difficult or Softserial port: You tin choose two of 7 digital pins as the advice channel, just plug the jumpers into the headers
- Reserved pinouts from HM-11: There are reserved pinouts from the HM-11 module, such every bit CTS1, RTS1, and PIO2, etc.
- Reset Push button: For reset of the shield, doesn't affect the mainboard even if its plugged in
Note: This shield is only best compatible with the following boards:
- Arduino Uno/Seeeduino v4.2
- Arduino Leonardo/Seeeduino Lite
Interested to notice out more?
- We've provided an Arduino pairing tutorial on our product page!
Arduino Bluetooth Projects
To end today'southward guide to Arduino Bluetooth modules, hither are 2 simple Arduino Bluetooth projects you tin can get started!
Control your robotic motorcar through Bluetooth
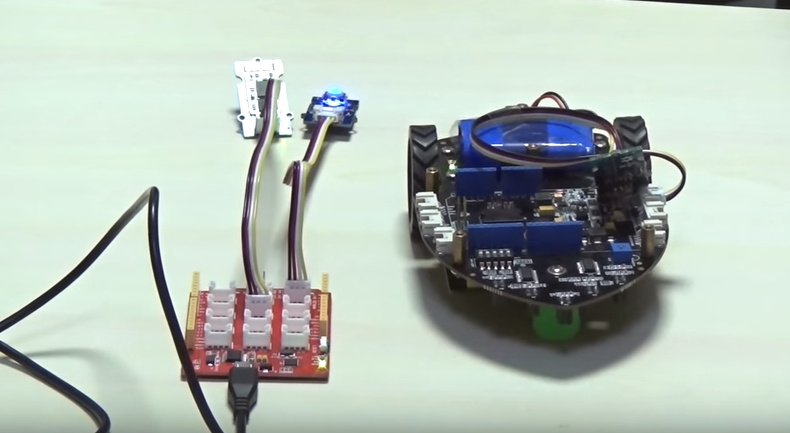
Robotics and Arduino is a fun and interesting hobby which is very unremarkably seen nowadays. With this project, you tin experience that through the aid of Bluetooth!
Here's what you need:
Hardware components:
- 2 Seeeduino Lotus
- 2 Grove – Series Blueseeed (CSR BC417)
- Shield Bot or other cars
- Grove – Mini Track Ball
Software apps and other services:
- Arduino IDE
Interested to find out more than? Check out the full tutorial by Kevin-Lee on Seeed Community Hub!
Fun, Footling, Scary Horror Doll

Desire to pull a footling prank on someone and go their hilarious reaction? This project is the one for you!
It uses a controller to small doll eyes emitting light of terror. Information technology can swing and turn hands, head, and emits a scream of terror. Mount a PIR sensor above and when someone is close to information technology, information technology'll spring out to scare them!
Here's what you lot need:
Hardware components:
- Grove – PIR Move Sensor
- 2 Grove – Chainable RGB LED
- Grove – Servo
- Grove – Serial Blueseeed (CSR BC417)
This projection uses Wio Link, notwithstanding, you lot tin can even so use an Arduino board with a Grove – Base of operations Shield
Interested to find out more? Check out the full tutorial by shijian.fang on Seeed Community Hub!
Summary
That's all for today on Arduino Bluetooth. I hope with today's web log, you get a deeper understanding of how to pair Arduino with Bluetooth!
To help you easily go started with your next Arduino Bluetooth project, do consider the list of Arduino Bluetooth modules and shields covered today!
How to Make an Arduino Nano Bluetooth for Airsoft
Posted by: swordsbaccustelic.blogspot.com
0 Response to "How to Make an Arduino Nano Bluetooth for Airsoft"
Post a Comment